


NOTE: Documentation updated on 10 August 2023.
OrbisReseller plugin usage documentation for ROOT (WHM/cPanel server administrators).
ANNEX: The only OrbisReseller plugin license provider is AtresHost. If you have purchased the OrbisReseller plugin license from a website other than atreshost.com, it means that you have purchased a cracked (pirated) license of the plugin, which involves an alteration of the plugin code. Purchasing pirated licenses of OrbisReseller implies a very serious security problem, generating serious security issues such as the following:
- Inclusion of malware code.
- Backdoors access to the server and to all the information of your clients.
- Server instability.
- Plugin malfunction.
- Having outdated and insecure versions of the plugin.
- Loss of official support from AtresHost.
Those are some of the main security issues that can be generated if you use cracked licenses of the OrbisReseller plugin or any other cracked software or control panel such as cPanel.
For more information off how the work the pirates and the serious security issues involved in using cracked licenses, please visit the following link: https://infosecwriteups.com/shared-license-or-crack-access-to-1000-servers-2c4d97b9b22b
Finally, you can check if your OrbisReseller license is legal. Just enter your server IP in our license checker: https://atreshost.com/en/panel/index.php?m=licensing&language=english
INSTALLATION
Once you have purchased the OrbisReseller plugin, you will automatically receive a first email with your OrbisReseller license information and the linked user documentation.
In addition to providing you with the OrbisReseller licence key, we inform you that within a maximum of 24 hours, you will receive a second email with detailed instructions on how to install OrbisReseller. This is because each OrbisReseller installer is associated with each customer’s account and involves a manual management process.
NOTE: The OrbisReseller plugin installation link received in the second email is for single use only. If for any reason the installation fails, you must contact us via a ticket from the customer area to request a new installation link for the plugin.
OrbisReseller installation requirements
The installation requirements for the OrbisReseller plugin are as follows:
- WHM / cPanel minimum version 96
- 2 CPU
- 2GB RAM
- 20GB disk space
- Ioncube loader installed in Tweak Settings
- Ioncube Loader 12 extension in EasyApache
- PHP 8.X version installed and enabled
- allow_url_fopen and PDO enabled
NOTE: OrbisReseller can only be used on servers with a legal and active WHM/cPanel “Pro” (30 cPanel accounts) or higher (Premier, 100 or more cPanel accounts) license. Any “shared” license, trial license or DNSONLY license will not be accepted for OrbisReseller use.
NOTE 2: No refund is offered on the purchase of OrbisReseller. Before purchasing the plugin, evaluate if the product is suitable for you and your services, if you meet the OrbisReseller installation requirements and have the proper WHM/cPanel license installed on your server to use the OrbisReseller plugin.
You need to review all the OrbisReseller plugin installation requirements before you start installing the plugin.
If you do not meet all the requirements, you will receive installation errors, preventing you from installing the plugin.
We recommend you to review the license conditions in the following link: https://orbisreseller.com/license-conditions/
OrbisReseller Installation
To install the OrbisReseller plugin, access the WHM terminal or make an SSH connection to your server and follow the steps indicated in the second email you received.
NOTE: Install OrbisReseller plugin only on the server indicated during the purchase process. If you have indicated that the IP address of the server is, for example, 1.1.1.1.1, install the plugin only on that server. Attempting to install the plugin on any other server will void the download and is a violation of the OrbisReseller plugin license terms.
OrbisReseller Update
When a new version of the OrbisReseller plugin is available, you will receive an email with update instructions.
Uninstalling OrbisReseller
To perform an uninstall of the OrbisReseller plugin, login to the WHM terminal or make an SSH connection to your server and follow the steps below:
- cd /usr/local/cpanel/orbisreseller
- ./install
- 1
- rm -rf /usr/local/cpanel/orbisreseller
Additional note
If you would like us to install OrbisReseller on your server, please purchase the “Install / uninstall OrbisReseller Plugin” addon for 29€/installation from the customer area and open a support ticket with the following details:
- Your server IP
- Your root password
- SSH port number
CONFIGURATION
Once the OrbisReseller plugin is installed, it is time to start the configuration.
To do this, in the “Plugins” section of WHM, click on “OrbisReseller” to start the configuration.
OrbisReseller license activation
The first step is to activate the OrbisReseller plugin license.
In the OrbisReseller plugin menu, click on “Settings”, enter your OrbisReseller license in the “License Management” section and click on the “Check License” button.
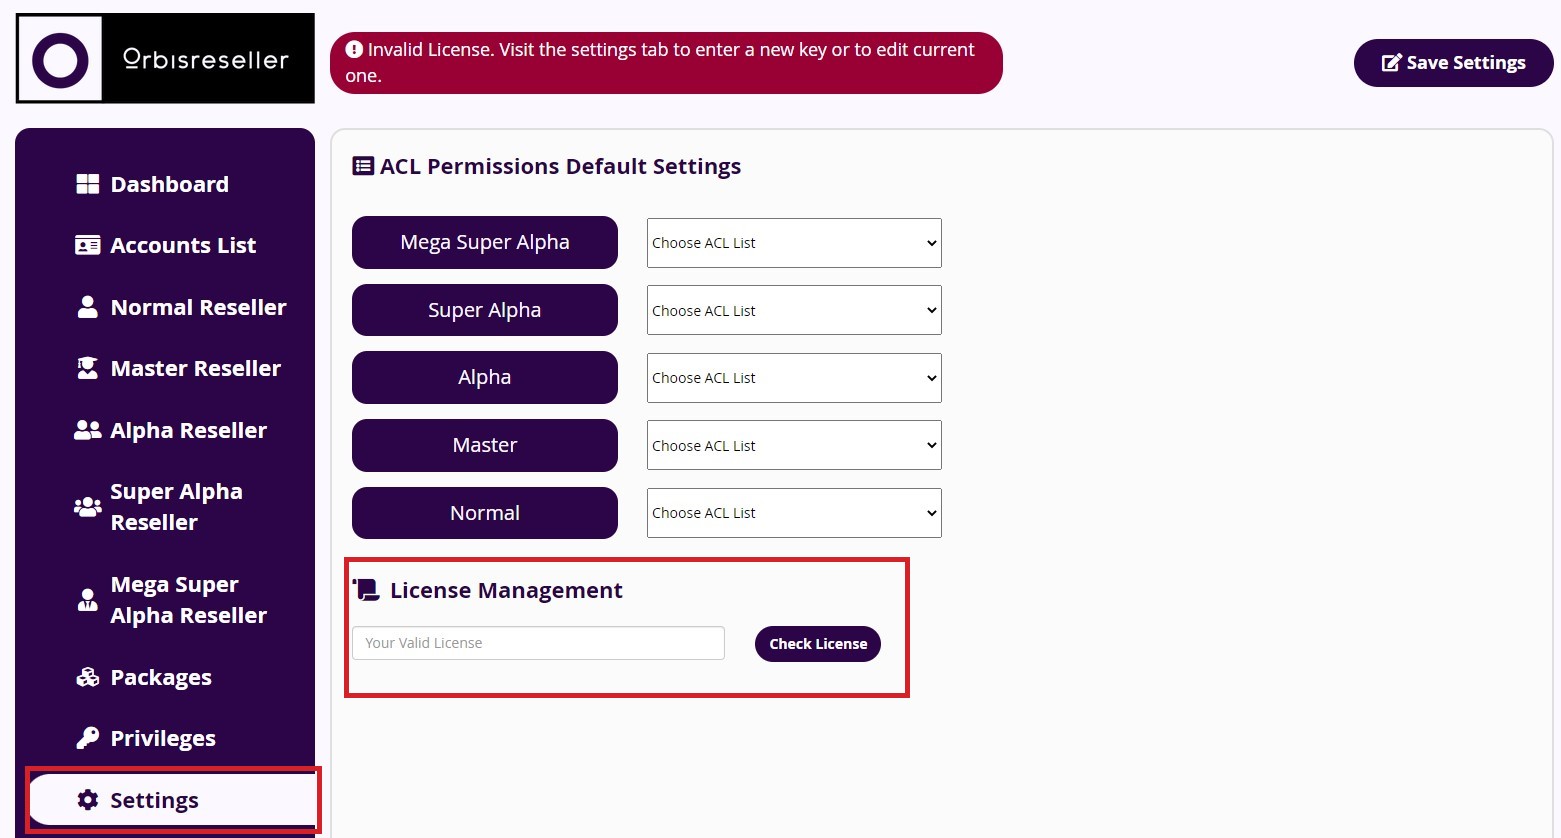
If the licence is correct and valid, a message will appear with the following text: “Your license is valid”.

NOTE: the license key is available in the first email received and in the AtresHost client area, and it is a key like the following: orbisreseller-ef37fcbxxx.
Dashboard
Once you have verified the license key of the OrbisReseller plugin, click on “Dashboard” to go to the main page of the plugin.
On the Dashboard you will find the information of all available reseller accounts detailed by levels, as well as all created packages and a couple of disk usage / bandwidth graphs.
In the navigation menu of the OrbisReseller plugin, you will find the following options:
- Dashboard: main page.
- Accounts List: list and creation of cPanel accounts.
- Normal Reseller: list and creation of reseller level accounts.
- Master Reseller: list and creation of Master Reseller level accounts.
- Alpha Reseller: list and creation of Alpha reseller level accounts.
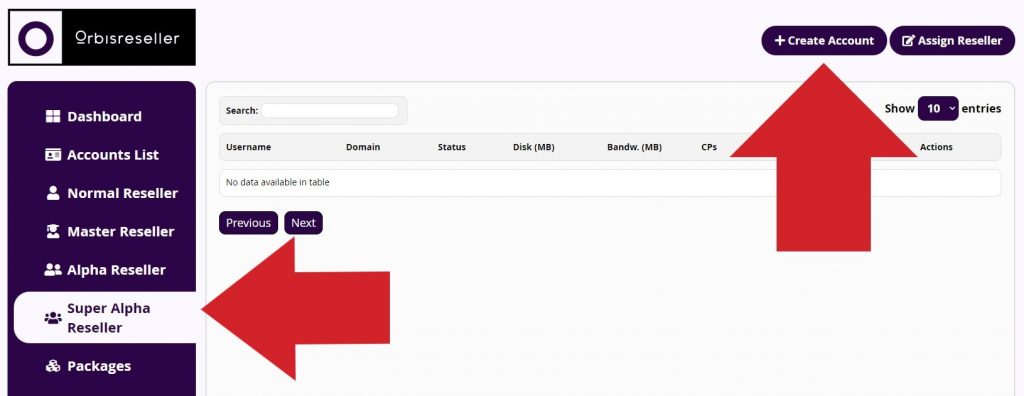
- Super Alpha Reseller: list and creation of Super Alpha reseller level accounts.
- Mega Super Alpha Reseller: list and creation of Mega Super Alpha reseller level accounts.
- Packages: assignment of reseller levels to WHM packages.
- Privileges: creation of ACL lists with privileges.
- Settings: license key validation and assignment of ACL lists to reseller levels.
Privileges
The next step is to create an ACL list with the permissions you require to assign to the different reseller levels.
Click on “Privileges” and click again on the “+ Add ACL List” button to create a new ACL list.
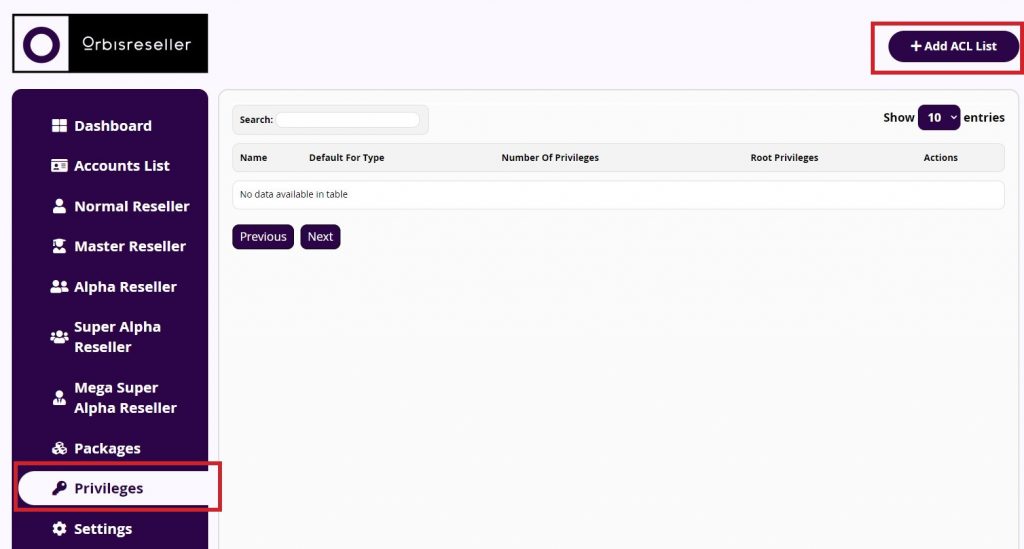
A popup window will open with all available ACL options.
Type the name of the ACL list in the “Name” field and check the boxes (privileges) you require and click the “Confirm” button.
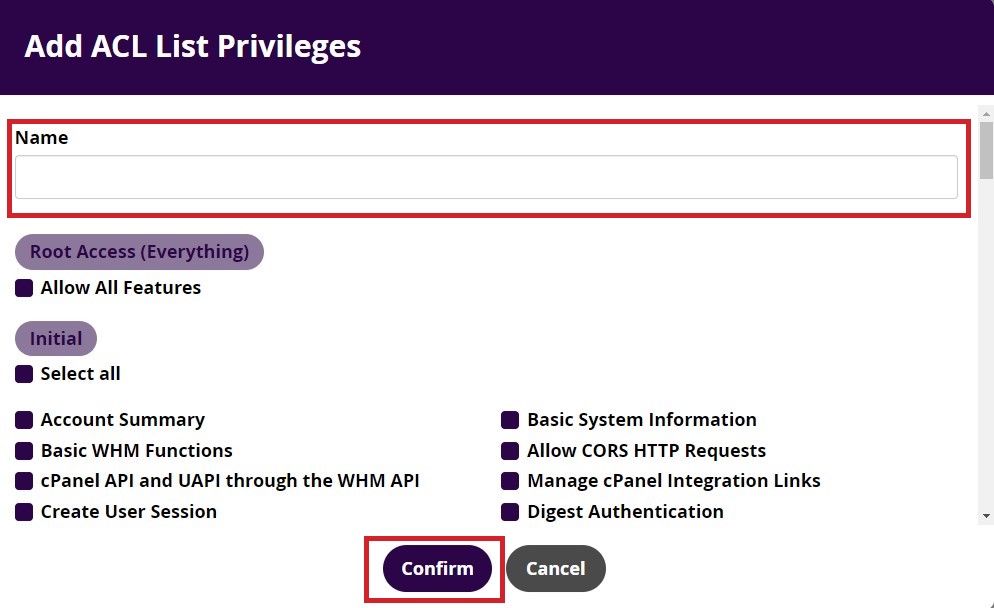
If the ACL list has been successfully created, the following confirmation message appears: “ACL list has been saved successfully”.

Finally, you have to assign the created ACL list to the different reseller levels.
Click on “Settings”, select the ACL list you have created from the drop-down menus of each reseller level and click on the “Save Settings” button.
NOTE: If for some reason you need each reseller level to have a custom ACL list, you can configure a different ACL list for each reseller level.
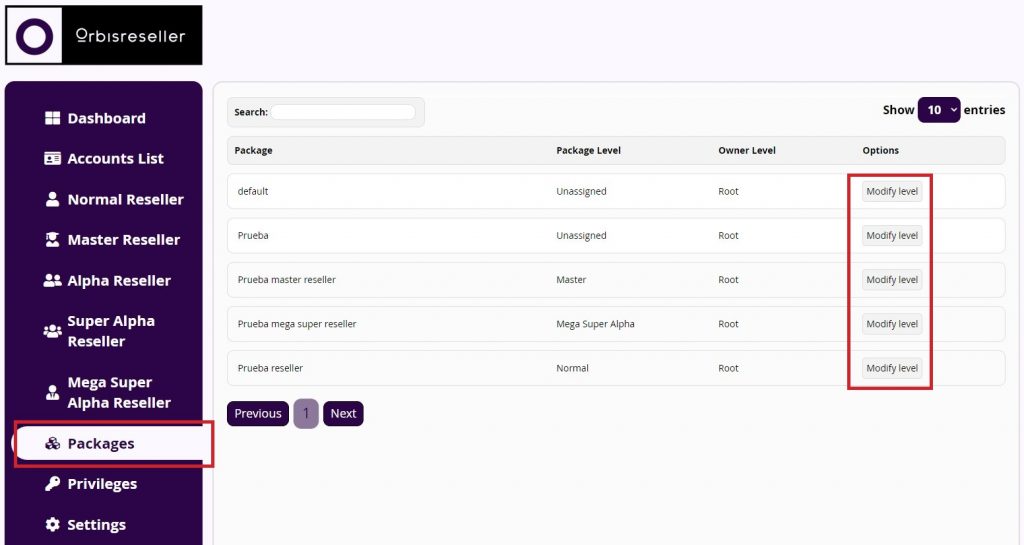
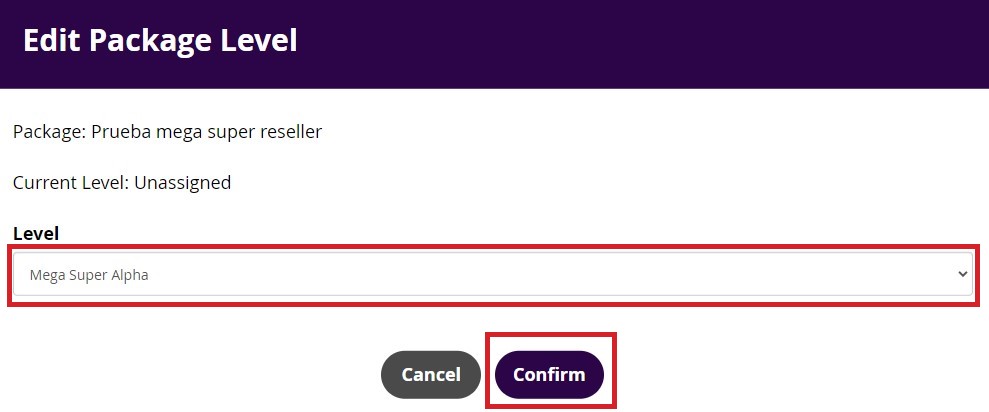
Assign reseller levels to packages
The last configuration is assign the reseller levels to the packages you have created in WHM.
Click on “Packages” and click again on the “Modify level” button of the different packages you have created in WHM.
NOTE: If you do not have any packages created, you must first create the packages from WHM.
A popup window will open in which you will have to select from the drop-down list the reseller level you want to assign to each package. Once you have assigned the desired reseller level (normal, master, alpha, super alpha, or mega super alpha), save the changes by clicking on the “Confirm” button.
NOTE: the “unassigned” level is for cPanel accounts.
USE OF ORBISRESELLER
This section is to show you how to use the different functions of the plugin.
Create a cPanel account from OrbisReseller
To create a cPanel account in the OrbisReseller plugin, click on “Accounts List” and click again on the “+ Create Account” button.
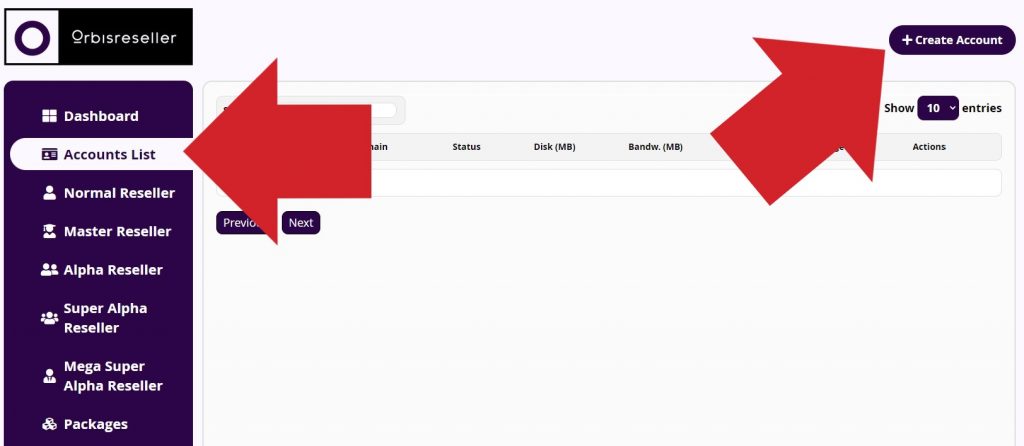
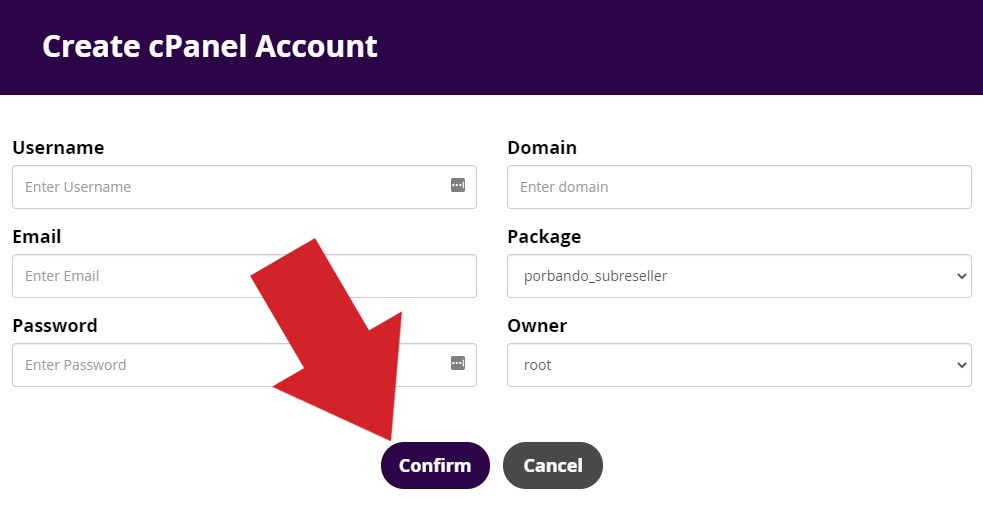
A popup window will open in which you will have to enter the information required for the creation of the cPanel account: username, domain, email, package, password and owner.
Username: account username without spaces, special characters / symbols.
Domain: enter the domain of the account to be created.
Owner: select the owner of the account.
Email: email address of your customer.
Package: choose one of the packages you have created.
Password: enter a password for the account.
Fill in the information and click the “Confirm” button to create the cPanel account.
Create a reseller account from OrbisReseller
To create an account of any reseller level in the OrbisReseller plugin, click on the desired reseller level and click again on the “+ Create Account” button.
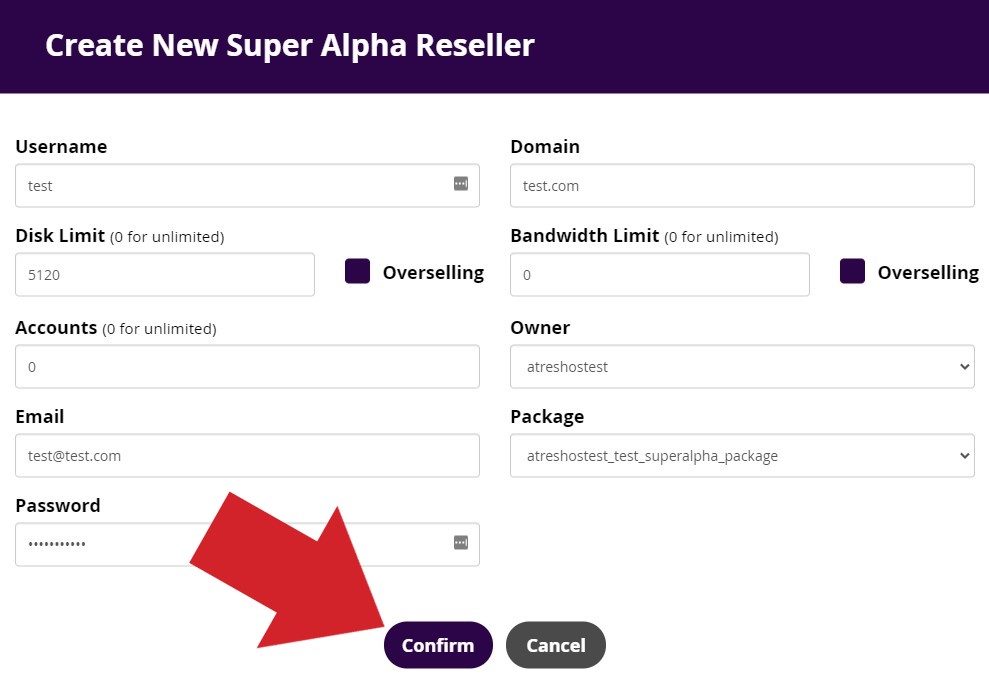
In the following example, we are going to create a Super Alpha Reseller level account by clicking on “Super Alpha Reseller”.
A popup window will open in which you will have to enter the information required for the creation of the selected reseller level account: username, domain, disk limit, disk limit, badnwidth limit, accounts, email, package, password and owner.
Username: username of the account.
Domain: enter the domain of the account to be created.
Disk Limit: enter the space in MB allocated to the account. 0 for unlimited space.
Bandwidth Limit: enter the amount of traffic allocated to the account. 0 for unlimited traffic.
Accounts: enter the accounts that the reseller account can create. 0 for unlimited accounts.
Owner: select the owner of the account.
Email: your customer’s email address.
Package: choose one of the packages you have created.
Password: enter a password for the account.
Fill in the information and click the “Confirm” button to create the reseller account.
Assign reseller
If you already have reseller accounts in WHM before installing the OrbisReseller plugin, you must assign them with the “Assign Reseller” function.
Click on “Normal Reseller” and click again on “Assign Reseller”.
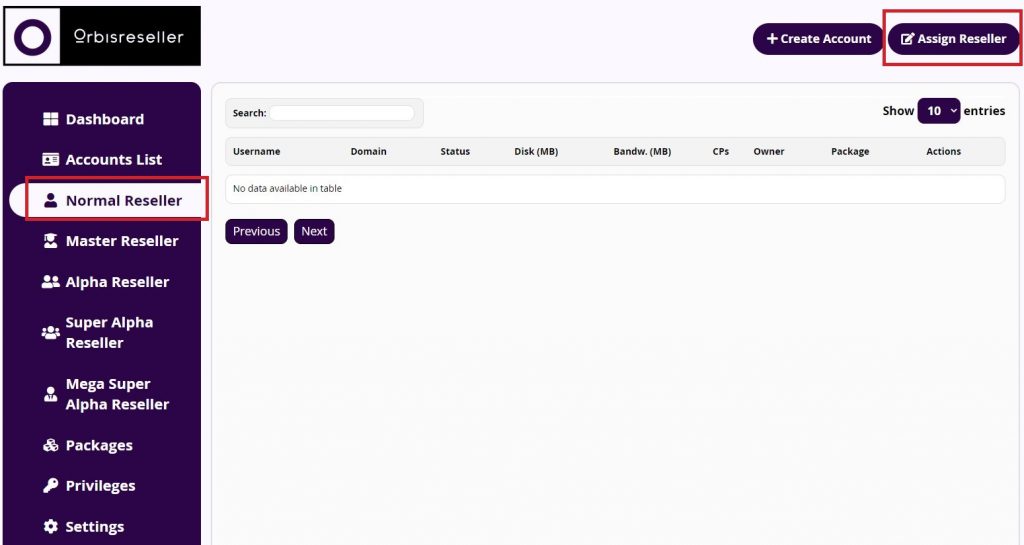
A new popup window will open in which you will have to select the reseller account you want to be configured as a reseller account in OrbisReseller and, finally, confirm your selection by clicking on the “Confirm” button.
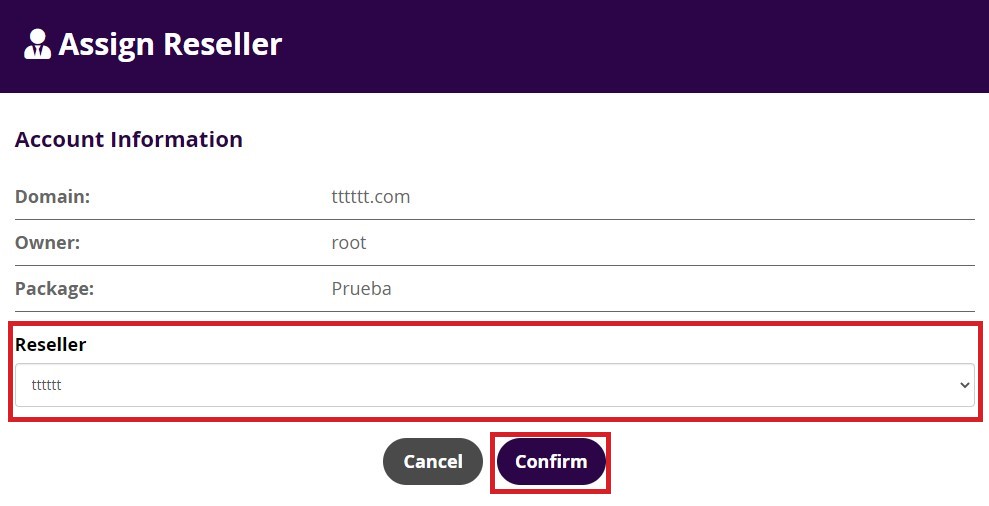
If the assignment was successful, you will get the following confirmation message: “Reseller has been assigned successfully”.

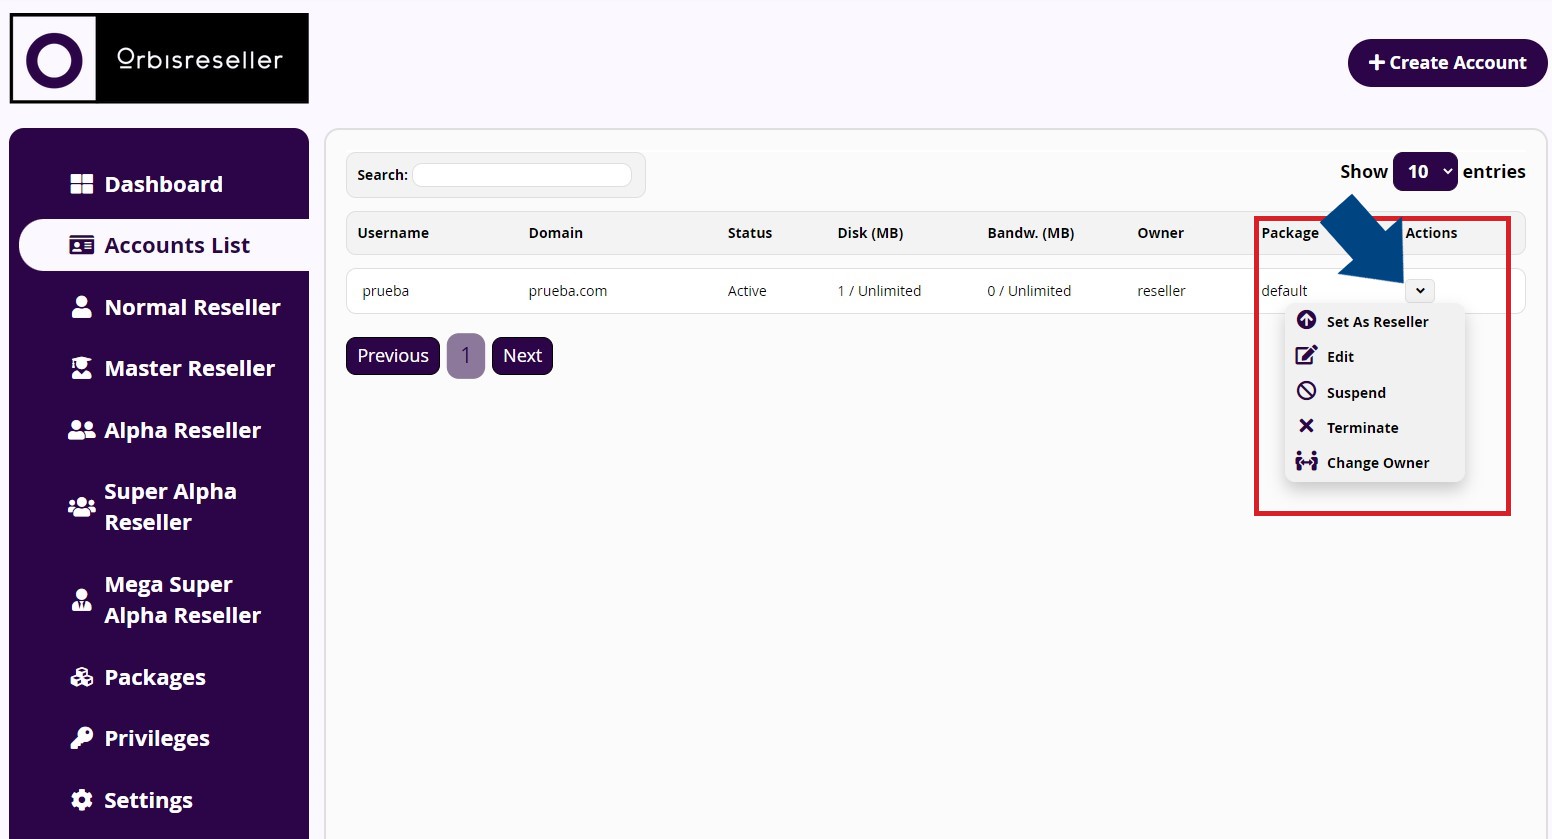
Other cPanel and Reseller account management functions
OrbisReseller has several management options for cPanel accounts and any Reseller level.
Functions of cPanel accounts:
Set As Reseller: convert a cPanel account to a reseller account.
Edit: edit a cPanel account.
Suspend: Suspend a cPanel account.
Terminate: Delete a cPanel account.
Change Owner: change the owner of a cPanel account.
These options are available by selecting the drop-down arrow of the cPanel account in which you need to perform any of the indicated actions.
Functions for reseller accounts of any level:
Edit: edit a reseller account.
Accounts: shows all accounts created by the reseller.
Suspend: suspend a reseller account.
Unsuspend: unsuspend a reseller account.
Upgrade: upgrade a reseller account.
Downgrade: downgrade a reseller account.
Unsetup: return a reseller account to a cPanel account.
Terminate: delete a reseller account.
Change Owner: change the owner of a cPanel account.
These options are available by selecting the drop-down arrow of the reseller account in which you want to perform any of the indicated actions.
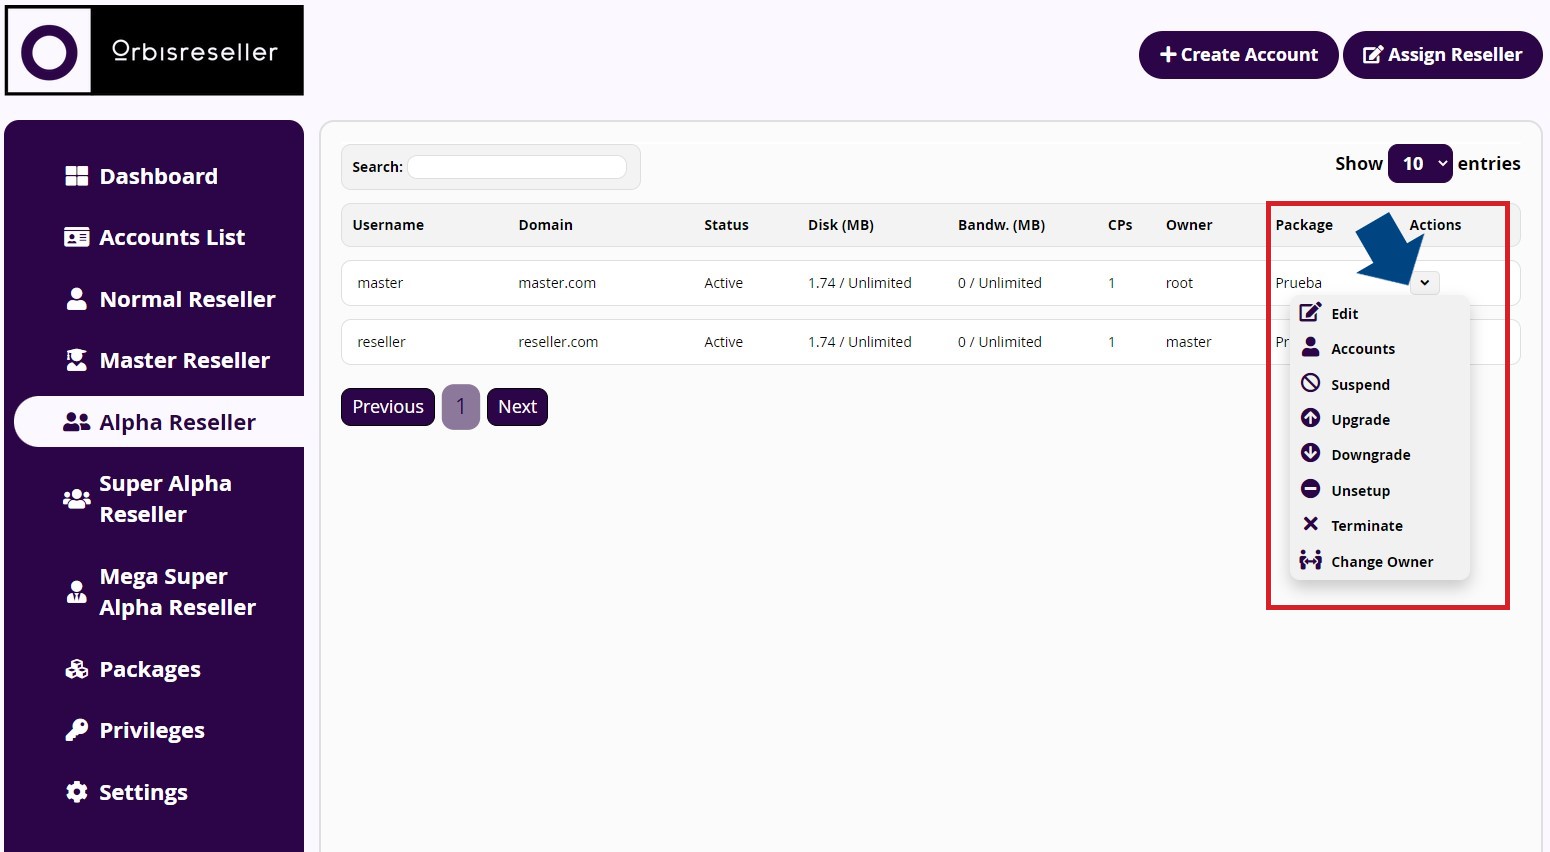
NOTE: the actions of suspending, unsuspending and terminating a reseller account will affect all the reseller accounts that depend on it, so you must be very careful when suspending and terminating a reseller account, as all the accounts associated to the main reseller account will be suspended / deleted.
PRODUCT CONFIGURATION IN WHMCS
Finally, the product configuration in WHMCS is as usual, you don’t have to do any special configuration.
When creating your products, you only have to take into consideration a couple of notes:
- For hosting plans, the product type you should select is “Hosting Account”.
- For any reseller level plans, the product type to select is “Reseller Account”.
The assignment of the reseller levels is done automatically in the sales made in WHMCS. To do this, remember to first make the configuration of the reseller levels assignment to the packages you have in WHM.
LICENSE VALIDATION
You can check at any time if your OrbisReseller plugin license is legal and valid by entering the domain or server IP in the license validator of AtresHost: https://atreshost.com/en/panel/index.php?m=licensing&language=english
THE ONLY LICENSING PROVIDER FOR ORBISRESELLER IS ATRESHOST.
If you have purchased the plugin from any other website, you are using an ILLEGAL version of the plugin, with the risks to your server and the data on the server.
Please contact us to report the illegal sale or use of the OrbisReseller plugin by submitting a ticket from the customer area.
ERRORS AND SERVER CHANGE
White page:
If after installing the plugin you get a white page when accessing the OrbisReseller plugin, it means that the plugin has not been installed correctly because the server does not meet the recommended requirements for installation.
To fix the issue, check the OrbisReseller installation requirements, make sure your server meets the OrbisReseller plugin installation requirements and finally, submit a ticket to support requesting a new installer.
Additional Note OrbisReseller Plugin Installation
If you would like us to install OrbisReseller on your server, please purchase the “Install / uninstall OrbisReseller Plugin” addon for 29€/installation from the customer area and open a support ticket with the following details:
- Your server IP
- Your root password
- SSH port number
Change of server:
If you need to change servers and install the OrbisReseller plugin on a new server, you first need to uninstall OrbisReseller from the old server. Once you have uninstalled the plugin, submit a support ticket requesting a new installer so that you can install the OrbisReseller plugin on the new server.
QUESTIONS AND SUPPORT
If you have any questions or need support for any problem you have, do not hesitate to open a ticket from the customer area. We will be happy to answer and help you as soon as possible.
NOTE: please note that we do not perform configurations, the support is limited to the resolution of possible errors or clarification of doubts you may have.